Introduction
MailerLite is a powerful marketing platform designed to transform your email campaigns into compelling narratives that resonate with your audience. From creating visually stunning campaigns using the inbuilt templates to automating personalized interactions, effortless and seamless integrations with your other tools of choice, and navigating a robust support ecosystem, this guide is your roadmap to unlocking the full potential of the platform.
We delve deep and explore its fundamental features and reveal how MailerLite stands apart from its competitors as a beacon for marketers seeking not only a user-friendly platform but also a supportive community.
Table of Contents
Pricing Plans
MailerLite has a very clear and affordable pricing structure. Depending on your needs, it allows you to easily scale as and when required. This section delves deeper into the platform’s pricing plans, ensuring you have a clear picture of what to expect as you consider this powerful and amazing tool for your marketing needs. This step is very crucial when considering any email marketing plan. Price plays a huge (if not major) role when it comes to the adoption of a tool.

1. Free Plan
Let’s begin with the enticing entry point – MailerLite’s Free Plan. Yes, you read that right – free. This plan allows you to send emails to up to 12,000 subscribers per month, making it an excellent option for small businesses, startups, or those just getting started with email marketing. It’s a great way to explore MailerLite’s features without committing to a financial investment. MailerLite offers a a 30-day trial of premium features and it does not even require you to add a payment method (credit card) to do this as compared to other platforms that do.
2. Paid Plans
If you require advanced features or your subscriber list exceeds 12,000, MailerLite offers budget-friendly paid plans. For example, the starter Growing Business Plan is $9.00/month. This is a bargain. You can choose monthly or yearly subscriptions depending on your budget and/or needs.
Monthly Subscriptions
- The pricing is based on the number of subscribers.
- As your list grows, the cost increases accordingly.
- This flexibility ensures that you pay for what you use.
Annual Subscriptions
- Opting for an annual plan provides a cost advantage.
- It’s a smart choice for businesses with consistent email marketing needs.
3. High Volume Plans
High Volume Plans are suitable for businesses with substantial subscriber bases or high email frequency. These plans are tailored to accommodate larger audiences and frequent campaigns. The pricing is customized based on your specific requirements, offering a scalable solution for enterprises.
Image Placement: A visual representation of how High Volume Plans cater to large-scale email marketing could be beneficial.
Features
“Simplicity is the ultimate sophistication” according to Leonardo Da Vinci. The platform has a very intuitive and easy to use but very impressive suite of features. These features are designed to streamline your campaigns and maximize engagement.
1. Intuitive Drag-and-Drop Editor
Creating visually appealing emails is a breeze with MailerLite’s intuitive drag-and-drop editor. Whether you’re a design novice or a seasoned pro, this feature allows you to craft professional-looking emails without the need for complex coding.
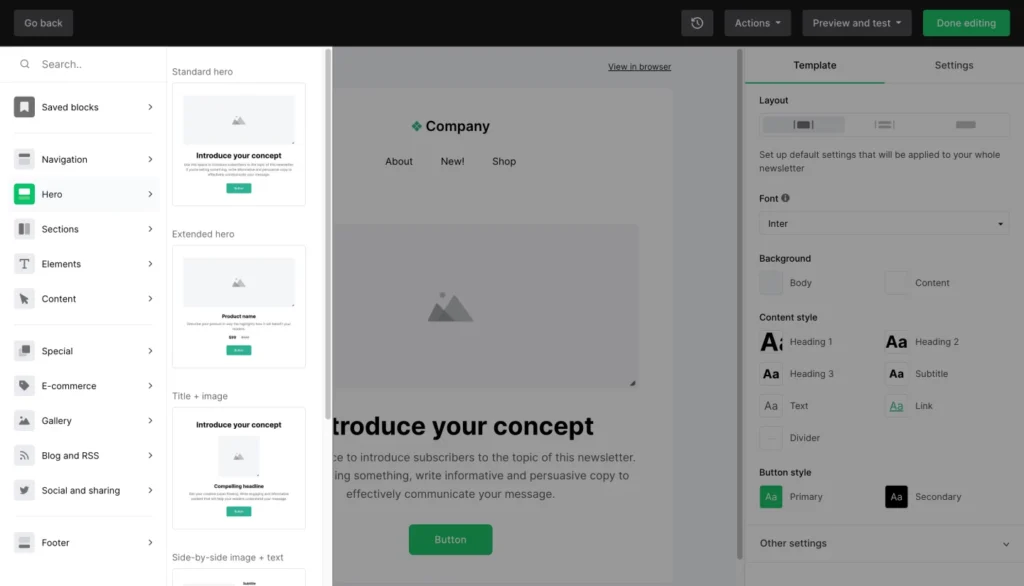
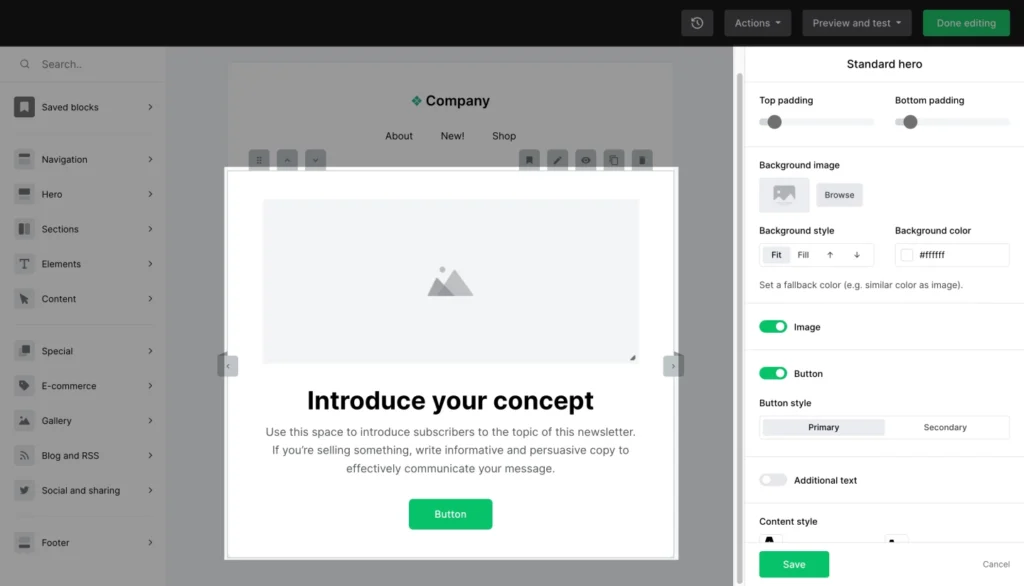
The graphics in 1 and 2 below show how easy it is to create a newsletter using the MailerLite Drag and Drop Editor.
-
On the left-hand sidebar, search for any block, such as a header, a text box, an image, or a button. Or, use the categories to find any block elements.

MailerLite Drag and Drop Interface - Drag and drop the block on any place in your newsletter.
-
Edit its content and settings on the right-hand sidebar.

MailerLite Drag and Drop Interface
2. Powerful Automation
Automation is a game-changer in email marketing, and MailerLite excels in this area. Set up automated workflows to send targeted emails based on user actions, ensuring that your subscribers receive the right content at the right time.
3. A/B Testing
Optimizing your email campaigns is made easy with MailerLite’s A/B testing feature. Test different subject lines, content, or sending times to identify what resonates best with your audience and improve your overall campaign performance.
4. Advanced Personalization
MailerLite allows you to go beyond the basics of personalization. Tailor your emails with dynamic content based on subscriber data, ensuring that each recipient receives content that speaks directly to their interests and preferences.
5. Subscriber Management
Efficiently manage your subscriber list with the platform’s comprehensive tools. From segmenting your audience based on behavior to handling unsubscribes seamlessly, you have the control to keep your lists organized and engaged.
6. Responsive Email Templates
In the modern era of diverse devices, ensuring your emails look good on every screen is of paramount importance. The platform provides a variety of responsive email templates that allow you to create campaigns that look great whether they are viewed on a desktop, tablet, or smartphone.
7. Analytics and Reporting
The platform provides analytics and reporting tools that give you the ability track the success of your campaigns with. Gain insights into open rates, click-through rates, and subscriber behavior. This will enable you to make informed data-driven decisions for future campaigns.
8. Landing Pages
Going beyond emails with its landing page feature, you can create visually stunning and high-converting landing pages directly within the platform, eliminating the need for third-party tools. These can easily be customized and optimized with no coding required.
9. Free Website Builder
The drag-and-drop website builder lets you design feature-packed, interactive websites in a flash. With several per-built templates to start with this makes it easy to start a blog, personal website, or online shop.
Setting Up Your Account
Setting up your account is the first step toward unlocking a world of powerful email marketing tools. In this section, we’ll walk you through the process. This will ensure a smooth start to your email marketing journey.
1. Creating Your Account
To begin, head to the MailerLite website and click on the “Sign Up” button. Fill in the necessary details, including your email address and a strong password. Once done, you’ll receive a confirmation email to verify your account.
2. Verifying Your Email
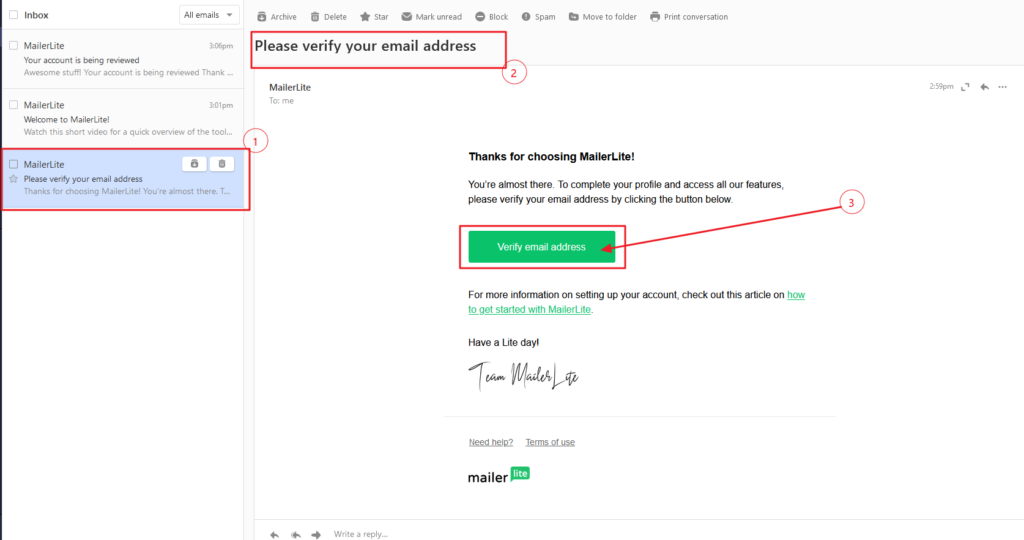
The screenshot below shows the most important things to look for in your verification email. This is quite crucial in the world where spam emails clog email inboxes.
- Look for the verification email from MailerLite and open it.
- Note that this will differ depending on your email client.
- The heading should clearly read “Please verify your email address”
- Click on the link that says “Verify email address” to confirm your email address. This step is very crucial to activate your account.
3. Signing In for the First Time
After verification, sign in to your account using your credentials. You’ll be greeted by a user-friendly dashboard where you can manage your email campaigns and explore various features.
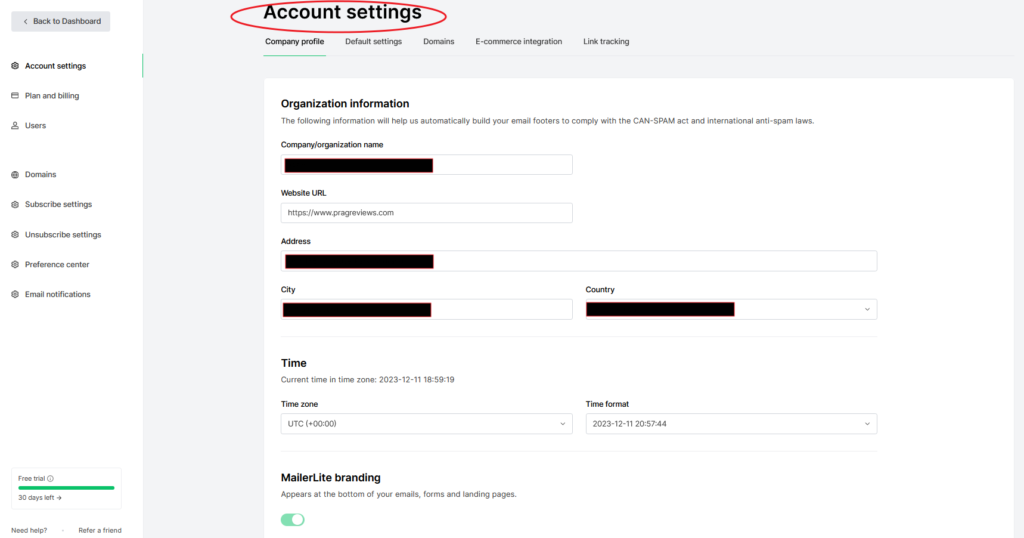
4. Setting Up Your (Company / Organization) Profile
Navigate to the Account Settings page to complete your profile. Add your organization’s name, address, and other essential details. This information is crucial for compliance with email marketing regulations.
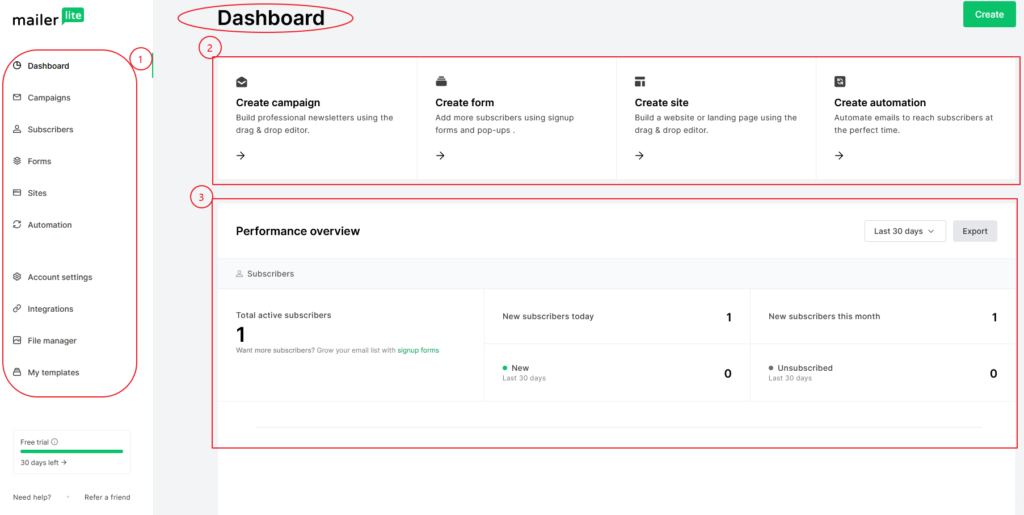
5. Exploring the Dashboard
Take a moment to explore the different sections of the platform’s dashboard. This will be your central hub for managing all aspects of your email marketing efforts.
- Familiarize yourself with the menu options on the left sidebar such as Campaigns, Subscribers, Forms, Sites, Automation and Integrations. Click on a section (menu item) to drill down to its details view.
- Create campaign, Create form, Create site, Create automation are short cuts to the commonly used or the most likely features you might start with using the platform.
- Performance overview gives a quick snapshot of how your chosen features like campaigns, subscriptions and the like are currently performing. This is a great feature as you can, at a glance, see the metrics right on the main dashboard.
6. Importing Your Contacts
If you have an existing contact list, import it into the platform. Various file formats, including the commonly used CSV (comma delimited values), are fully supported making the process quick, easy and straightforward.
Creating Your First Campaign
Now comes the exciting part – creating your first email campaign. Utilize the platform’s drag-and-drop editor to design visually appealing emails that resonate with your audience. Once your account is set up, the next exciting step is crafting engaging email campaigns.
This section walks you through the process of creating compelling campaigns that captivate your audience and drive results.
1. Accessing the Campaigns Dashboard
Upon signing in to your account:
- Navigate to the “Campaigns” section on the dashboard. Here, you’ll find all the tools you need to kick-start your email marketing efforts.
- Click Create
- Choose a Campaign Type
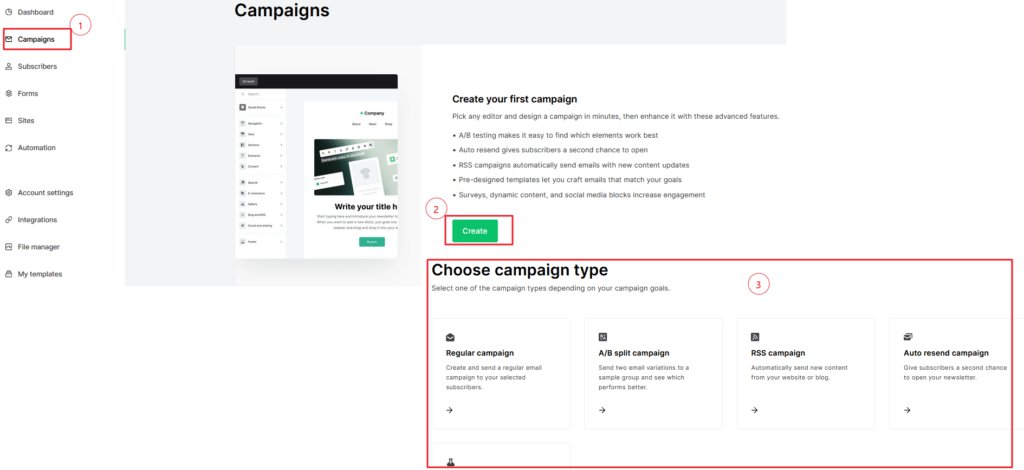
The platform offers various campaign types. These include Regular email campaign, A/B split campaign, Really Simple Syndication (RSS) campaign and Multivariate campaigns. Select the type that aligns with your campaign goals.
3. Designing Your Campaign
Click on “Create Campaign” to enter the campaign builder. Here, you’ll find the user-friendly drag-and-drop editor. Begin by selecting a template or starting from scratch.
4. Adding Content and Images
Customize your campaign by adding compelling content and visuals. Leverage the editor to include text, images, buttons, and other elements that resonate with your brand and message. Colorful pictures or images that align with the message and are appealing to the eye will, more likely than not, grab your audience’s attention forcing them to spend a little more time looking at your content.
5. Personalization and Dynamic Content
Enhance engagement by personalizing your emails. Use subscriber data to include dynamic content, ensuring each recipient receives a tailored message. Before hitting send, preview your campaign to ensure it looks great on different devices. Additionally, take advantage of the testing features to send a test email and review the campaign’s appearance and functionality.
7. Setting Up Delivery
Configure the delivery settings, including the sender’s name, email, and subject line. Choose when you want your campaign to be sent, whether immediately or at a scheduled time.
8. Tracking and Analytics
After sending your campaign, monitor its performance through the platform’s analytics. Track open rates, click-through rates, and other essential metrics to gain insights into your campaign’s success.
9. Re-sending to Unopened Emails
Maximize reach by re-sending your campaign to those who didn’t open the initial email. The platform simplifies this process, allowing you to resend with a different subject line or content.
Automation
Unlock the power of efficiency and engagement with MailerLite’s robust automation features. In this section, we’ll explore how you can leverage automation to streamline your email marketing efforts and deliver targeted, personalized messages to your audience.
1. Accessing the Automation Dashboard
To get started with automation, head to the “Automation” section in your dashboard. Here, you’ll find a variety of pre-built workflows and the tools needed to create your custom automated campaigns.
2. Choosing an Automation Workflow
The platform offers a range of automation workflows, from welcome sequences to post-purchase emails. Select a workflow that aligns with your campaign objectives.
3. Building Your Automation Workflow
Enter the workflow builder to craft your automation sequence. Drag and drop different elements to design a flow that guides subscribers through a personalized journey based on their actions.
4. Setting Triggers
Triggers initiate actions within your automation. Define triggers based on subscriber behavior, such as opening an email, clicking a link, or completing a purchase.
5. Adding Actions and Conditions
Enhance your workflow by adding actions and conditions. Actions could include sending emails, updating subscriber details, or adding/removing tags. Conditions ensure that subscribers only receive relevant content based on their behavior.
6. Personalization in Automation
Make your automated emails feel personalized with dynamic content. Utilize subscriber data to customize email content and create a more tailored experience.
7. Testing Your Automation
Before activating your workflow, test it to ensure that every step is functioning as expected. Send test emails and navigate through the workflow to identify and address any issues.
8. Activating Your Automation
Once you’re satisfied with your workflow, activate it to start delivering automated, targeted messages to your subscribers. Monitor its performance in real-time.
9. Analyzing Automation Performance
Track the success of your automated campaigns by analyzing performance metrics. The analytics provide valuable insights into open rates, click-through rates, and subscriber interactions.
Templates
Elevate the visual appeal of your email campaigns with MailerLite’s diverse and customizable templates. This section will show you the world of MailerLite templates, designed to make your email marketing endeavors both efficient and visually striking.
1. Accessing Templates
Begin by navigating to the “Templates” section within your dashboard. Here, you’ll find an extensive collection of pre-designed templates suitable for various occasions and purposes.
2. Choosing the Right Template
MailerLite offers templates for newsletters, promotions, announcements, and more. Browse through the categories and select a template that aligns with your campaign goals and brand aesthetics.
3. Customizing Templates
Once you’ve chosen a template, enter the user-friendly drag-and-drop editor to customize it. Easily modify text, images, and colors to match your brand identity and specific campaign requirements.
4. Responsive Design
All MailerLite templates are designed with responsiveness in mind, ensuring your emails look stunning on any device. Preview your template across different screen sizes to guarantee a seamless user experience.
5. Saving Custom Templates
If you’ve crafted a design you love, save it as a custom template for future use. This feature is especially handy for maintaining brand consistency across your campaigns.
6. Creating Templates from Scratch
For those who prefer a blank canvas, the platform allows you to create templates from scratch. Design unique layouts and structures tailored to your specific needs.
7. Template Marketplace
Explore the Template Marketplace for additional options. This dynamic marketplace features templates created by other MailerLite users, providing a wealth of inspiration and variety.
8. Testing Templates
Before sending your campaign, test your template to ensure it looks flawless. MailerLite provides a testing feature that allows you to preview your email and identify any potential issues.
Platform Integrations
Seamless connectivity is essential for optimizing your email marketing efforts. This process is simplified through MailerLite’s array of integrations, allowing you to sync your email campaigns with other tools and platforms. The platform can, currently, be integrated with over 140 other tools. This offers a lot of flexibility therefore not forcing choices on the platforms you can integrate with.
In this section, we’ll explore how to carry out the integrations so they can help enhance your overall marketing strategy.
1. Accessing MailerLite Integrations
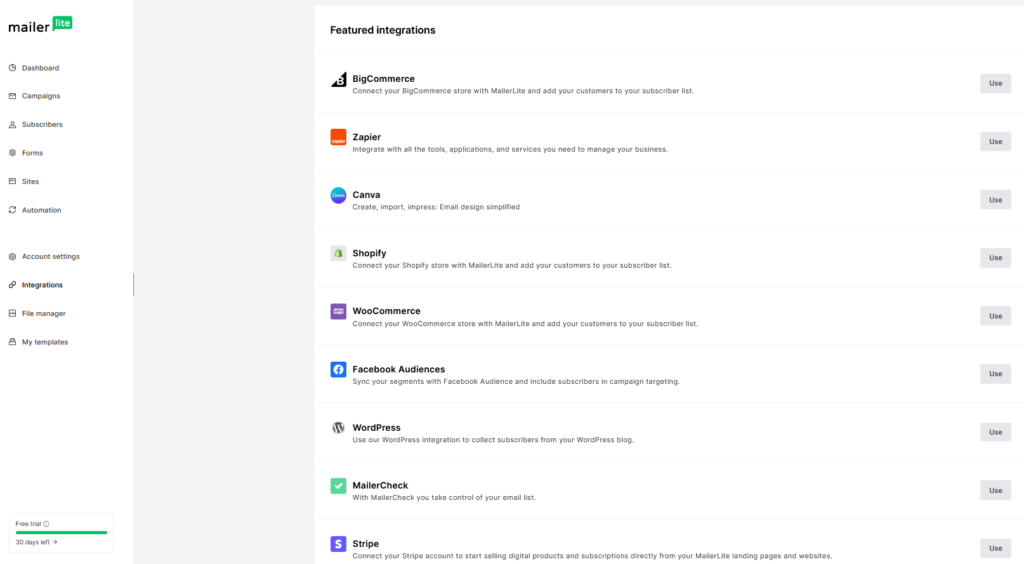
Begin by navigating to the “Integrations” section within your MailerLite dashboard. Here, you’ll discover a wide range of integrations compatible with the platform.
2. Examples of Popular Integrations
Seamless integrations are possible with a variety of popular tools across various categories. From e-commerce platforms like Shopify and WooCommerce to CRMs like HubSpot and Salesforce, explore integrations that align with your specific business needs.
3. Setting Up the Integrations
Select an integration and follow the step-by-step setup process. This typically involves granting permissions and authorizations to allow the platform to communicate with the chosen platform.
Integrating with other tools enhances your overall marketing efficiency. Benefits include automatic syncing of subscriber data, personalized targeting based on customer behavior, and streamlined workflows.
4. Testing Integrations
Before fully deploying your integrated setup, test the connections to ensure smooth data flow and functionality. This step is crucial for identifying and resolving any potential issues.
MailerLite Support
Ensuring a smooth email marketing experience requires reliable support, and MailerLite is committed to providing just that. We, in this section, explore the MailerLite support system, offering assistance when you need it most.
1. Accessing MailerLite Support
To access support, navigate to the “Support” or “Help” section in your dashboard. Here, you’ll find a wealth of resources to guide you through any challenges you may encounter.
2. Knowledge Base and FAQs
The Knowledge Base is a comprehensive resource featuring articles and frequently asked questions. Here, you can find detailed “How to” guides on various topics, troubleshooting solutions, and tips for optimizing your email campaigns.
3. Live Chat Support
Real-time assistance is available through its Live Chat Support. Connect with a support agent to get immediate answers to your queries or assistance with any technical issues you may be facing.
4. Email Support
For less urgent matters, or if you prefer email communication, email support is also readily available. Submit your queries through the designated contact form, and the support team will respond promptly.
5. Community and Forums
Join the community to connect with other users and gain insights from their experiences. Forums and community discussions provide a space to share tips, ask questions, and learn from the broader user community.
6. Video Tutorials
Visual learners will appreciate the collection of video tutorials the platform offers. These step-by-step guides cover various features and functionalities, offering a dynamic way to absorb information.
7. Social Media Support
Social media channels will keep you updated and engaged. Follow them on platforms like X (formerly Twitter) YouTube, Instagram, LinkedIn and Facebook for announcements, tips, and direct interaction with the team.
8. Premium Support for Paid Plans
Users on premium plans have access to priority support. This means quicker response times and dedicated assistance for users with higher-tier subscriptions.
Conclusion
In conclusion, MailerLite emerges as a formidable ally in the realm of email marketing, offering a comprehensive suite of tools accompanied by robust support mechanisms. As you embark on your journey to create impactful campaigns and connect with your audience, the features explored in this guide—from intuitive templates and automation workflows to seamless integrations and responsive support—underscore the platform’s commitment to simplifying and enhancing your marketing efforts.
Whether you’re a solo entrepreneur, a growing business, or an established enterprise, it’s user-friendly interface and versatile features cater to a spectrum of needs. The platform’s focus on accessibility is mirrored not only in its intuitive design but also in the extensive support ecosystem it provides. The Knowledge Base stands as a beacon of information, the Live Chat ensures instant assistance, and the community forums foster collaboration and shared insights.
As you continue to harness it’s power, we encourage you to explore, experiment, and stay informed. Leverage the diverse templates to create visually stunning campaigns, harness the automation features for targeted communication, integrate seamlessly with your preferred tools, and rest easy knowing that support is just a click away.
Remember, effective email marketing is not just about reaching your audience; it’s about creating meaningful connections. The platform provides you will all the tools and support needed to forge these connections and build relationships, turning subscribers into loyal advocates for your brand.
So, dive in, explore the possibilities, and let it be your trusted companion in the exciting and ever-evolving landscape of email marketing.
Here’s to successful campaigns, engaged subscribers, and the limitless potential that it brings to your marketing endeavors!
Remember to read our other insightful posts on other tools like Campaign Monitor and Constant Contact as you delve deeper into the multi-faceted and interesting world of email and affiliate marketing.

